Focus stacking is a photographic technique that combines a series of images - each focused at a different point - into a single, perfectly sharp result from front to back. Where a single shot gives you a sharp gemstone but a blurred band, or a sharp dial but a soft strap, focus stacking delivers complete sharpness across the entire depth of the subject. In product photography, macro work, and jewellery photography, it is not a stylistic choice - it is a technical necessity.
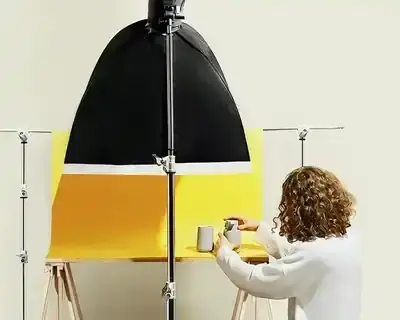
Focus stacking, unlike traditional methods, enables photographers to overcome the limitations of shallow depth of field encountered at macro distances and large focal lengths. Consider a coffee cup shot from close range, as in the image below: even at f/11, achieving full sharpness from the rim to the base in a single frame is physically impossible.

How Focus Stacking Works
The physics are straightforward: the closer the subject and the wider the aperture, the shallower the depth of field. A ring photographed with a macro lens at f/2.8 has a depth of field below 1mm. Even stopping down to f/16 gives only a few millimetres - and introduces diffraction that softens every frame in the series.
Focus stacking solves this in three steps:
- Capture a series of frames, shifting the focus point by a small increment (0.1-2mm depending on magnification) from the front to the back of the subject
- Software analyses each frame and selects the sharpest pixels from each
- Frames are blended into one image - sharp across its entire depth
Practical numbers: An engagement ring with a diamond requires 15-25 frames. A watch - 20-40. A necklace laid flat - 50 or more.
Applications and Limitations
Focus stacking has become indispensable in several fields. In macro photography, it captures exceptional detail on subjects so small that traditional photography leaves most of the frame out of focus. In product photography, it is the standard for presenting items with complete sharpness - critical for online retail where customers cannot physically inspect a product.
The technique also serves scientific documentation, where resolution of every surface detail is required. That said, focus stacking demands considerable time and skill in digital processing - it is not suited to dynamic situations, and as the subject count grows, automation becomes essential rather than optional.
When Is Focus Stacking Necessary?
| Subject | Required? | Reason |
|---|---|---|
| Jewellery (rings, earrings) | Always | Depth of field <1mm at macro distances |
| Watches | Yes | Dial + case + strap = large focus range |
| Electronics (PCBs, connectors) | Yes, at macro | Technical detail requires full sharpness |
| Cosmetics (bottles, tubes) | Often | Label + cap + bottle shape in one shot |
| Clothing | Rarely | Flat lay and model shoots have sufficient DOF |
| Furniture | No | Large subjects, adequate depth at f/8-f/11 |
Equipment for Focus Stacking
Macro Lenses
Focus stacking requires a sharp macro lens. The professional standard for product work is 1:1 reproduction (subject life-size on sensor) or greater. The ~100mm focal length is the benchmark: it provides ample working distance between lens and subject, reducing the risk of reflections in shiny surfaces and leaving room for lighting.
Proven options include the Canon EF 100mm f/2.8L Macro IS USM, the Nikon AF-S 105mm f/2.8G VR Micro, the Sony FE 90mm f/2.8 Macro G OSS, and the Sigma 105mm f/2.8 DG DN Macro Art. For extreme jewellery detail requiring 2:1 magnification, the Laowa 100mm f/2.8 2x Ultra Macro is worth considering.
Macro Rails (Focus Rails)
Rather than turning the focus ring manually - which is imprecise and causes minor camera movement - professional photographers use macro rails: guided tracks that move the camera by precise, repeatable increments.
For occasional work (5-10 frames), a manual rail such as the Sunwayfoto MFR-150 (~$150) is sufficient. For jewellery shoots requiring 20-50 frames, an automated rail becomes essential: manually advancing 40 times per product adds 20-30 minutes per shot. The WeMacro Rail (~$300) and the Cognisys StackShot 3X (~$400) are the professional benchmarks, both offering computer or remote control with step precision down to 1-10 micrometres.
Tripod and Stability
Focus stacking demands absolute stability. Any vibration between frames - from floor movement, a fan, or a brushed shutter button - produces misalignment that software may not fully correct. A studio tripod (Manfrotto 055, Gitzo Systematic) with a precision head is the appropriate investment, combined with a 2-second timer or cable release to eliminate shutter-press vibration.
Lighting
- Continuous LED panels - easiest to set up; you see the effect live. Lock white balance manually to a grey card. Godox SL60W and Amaran 200d are studio workhorses.
- Flash/strobe - more power, shorter exposure (less vibration risk). Godox AD200, Profoto B10.
- Light tent / softbox tent - for small products, omnidirectional diffusion eliminates hotspots on metallic and glossy surfaces.
Avoid live lighting that shifts between frames - daylight through a window, a flickering LED with unstable colour temperature. Every frame must be identical in exposure and white balance.
Focus Stacking for Jewellery Photography
Jewellery is the most demanding and most important application of focus stacking. Consider a diamond engagement ring photographed with a macro lens at f/5.6: the depth of field is approximately 2mm. The diamond itself has a diameter of 6-10mm. The band has a thickness of 2-4mm. A single frame cannot be sharp from the front of the stone to the back of the band.
Without focus stacking, there are two options - both compromises:
- f/2.8-f/5.6: sharp stone, blurred band (or vice versa)
- f/16-f/22: theoretically more depth, but diffraction degrades sharpness across the entire image
Focus stacking resolves this definitively: f/5.6-f/8 (the lens's sharpest aperture) × 15-25 frames = complete sharpness without diffraction.

Camera Settings for Jewellery
| Parameter | Value | Reason |
|---|---|---|
| Aperture | f/5.6-f/8 | Lens sweet spot: maximum sharpness, no diffraction |
| ISO | 100 (base ISO) | Minimum noise |
| Focus increment | 0.3-0.5mm | Covers full depth of ring or earring |
| Frame count (ring) | 15-25 | Depends on piece depth and angle |
| Frame count (necklace) | 20-40 | Flat position = larger focus range |
| White balance | Manual (grey card) | Consistency across series; accurate metal colour |
| Format | RAW | Full post-processing flexibility |
| Exposure mode | Manual (M) | Identical exposure across every frame |
| Shutter release | 2s timer or cable release | Zero vibration from shutter press |
Step-by-Step: Stacking a Ring
1. Prepare the product
- Clean the jewellery with a microfibre cloth and 99% isopropanol
- Secure the ring on museum wax or a dedicated jewellery mount
- Angle the piece to show both the stone and the band
- Check for dust and fingerprints under magnification - both are clearly visible in macro
2. Set the lighting
- Two LED softboxes at 45° (eliminates harsh reflections on metal)
- Optional: a third backlight to define edges
- For diamonds: one specular point light to create the "fire" in the facets
- Backlit white acrylic base or grey background with shadow added in retouch
3. Capture the series
- Mount camera on tripod with macro rail
- First focus point: the nearest element (front edge of stone)
- Advance the rail 0.3-0.5mm, capture the next frame
- Repeat through to the furthest element (back of band)
- With an automated rail (WeMacro/StackShot): set start, end, and increment - the rail executes the sequence automatically
4. Processing
- Import RAW sequence into Lightroom or Capture One: correct exposure, white balance, sharpening - identically across all frames
- Export as 16-bit TIFF
- Import into Helicon Focus or Zerene Stacker
- Choose algorithm: Method B (depth map) or Weighted Average in Helicon; PMax in Zerene - both handle jewellery reflections well
- Review the result at 100% zoom; correct the mask manually in problem areas
5. Final retouch
- Photoshop: remove stacking artefacts (edge halos)
- Retouch dust, scratches, metal imperfections
- Dodge & burn: enhance metal lustre and stone brilliance
- Clip the background and place on white
- Export: TIFF 300dpi (print), JPEG sRGB 72dpi (web)
Read more about our approach to jewellery photography.
Focus Stacking Software - 2026 Comparison
Choosing the right software has a significant impact on output quality and workflow speed. Three tools dominate professional use in 2026; the rest serve niche or entry-level purposes.
| Software | Price | Speed | Mask Retouching | Batch | Best For |
|---|---|---|---|---|---|
| Helicon Focus | $55/yr or $200 perpetual | Fastest | Yes | Yes | Studio volume; best speed-to-quality ratio |
| Zerene Stacker | ~$115 perpetual | Slower (no GPU) | Yes (best) | Yes | Jewellery, extreme macro detail |
| Adobe Photoshop | ~$120/yr (CC) | Slowest | Limited | Limited | Occasional stacking within Adobe workflow |
| Luminar Neo | ~$70 | Very fast (AI) | Automatic | Yes | Quick turnarounds; beginners |
| Affinity Photo 2 | ~$70 perpetual | Medium | Limited | No | Budget alternative; good quality |
Helicon Focus
Helicon Focus is the go-to tool for product photography studios handling high volumes. It is 3x faster than Photoshop for comparable stacks, processes a 1000-frame sequence in 2-5 minutes on a modern CPU, and offers three rendering algorithms (Weighted Average, Depth Map, Pyramid) - each suited to different subject types. The depth map algorithm (Method B) handles metallic surfaces particularly well, while the pyramid method is useful for subjects with fine texture transitions.

Helicon Focus Producer Site
Helicon Focus Tutorial - how to do focus stacking in the Helicon Focus application
Focus Stacking in Photoshop
Adobe Photoshop offers focus stacking through its Auto-Blend Layers function (Edit → Auto-Blend Layers → Stack Images). The 2025-2026 versions have improved meaningfully, and the two-step process - align first, then stack - allows for manual intervention between stages. It remains the right choice if you already have Creative Cloud and stack only a few times per month. For systematic jewellery or macro work, the processing speed and limited batch handling make it a secondary option.

Adobe Photoshop website
Adobe Photoshop tutorial - how to do focus stacking in Photoshop
Zerene Stacker
Zerene Stacker is the precision specialist - preferred by jewellery photographers and scientific documentarians where quality outweighs speed. Its PMax algorithm is particularly effective at preserving highlights in gemstones and handling reflective metallic surfaces. The major limitation in 2026 remains the lack of GPU acceleration: the same 1000-frame stack that Helicon processes in 5 minutes takes Zerene 15-30 minutes. For studios processing dozens of products daily, this matters; for photographers prioritising absolute quality on a key portfolio piece, Zerene remains the gold standard.
Zerene Stacker Website
Zerene Stacker tutorial - how to do focus stacking in Zerene Stacker
AI-Powered Tools (2026)
Luminar Neo (Skylum) introduced AI-assisted focus stacking as an extension: it automatically identifies the sharpest areas across all frames, corrects lens distortion and chromatic aberration in RAW files, and requires fewer manual decisions. The result is significantly faster than traditional workflows, though with less manual control over blending decisions. In 2026, roughly 40-50% of studios use Luminar Neo or ON1 Photo RAW 2026 for rapid jobs, while reserving Helicon or Zerene for portfolio and premium work.
Luminar Neo Focus Stacking - official Skylum page
Free Alternative: CombineZP
CombineZP is a free Windows application that allows basic frame blending for improved depth of field. It is a valid starting point for photographers new to the technique who want to experiment before committing to paid software.
Affinity Photo
Affinity Photo 2 is a one-time-purchase alternative to Photoshop (~$70) that includes a Focus Merge function. Quality is good for occasional use; it lacks batch processing and advanced mask retouching tools, making it unsuitable for production volume work.
Mobile Apps
Mobile applications such as Stackables and Focus Stacker allow basic blending on iOS and Android, albeit with limited control and precision compared to desktop tools. They are useful for learning the concept, not for professional output.
Camera Features for Focus Stacking (2026)
Modern mirrorless cameras have significantly reduced the manual effort required to capture stacking sequences. All three major systems now offer automated focus bracketing, though with different implementations and limitations.
Canon EOS R System - Best in Class
Canon's Focus Bracketing (available on EOS RP, R5, R6, and newer R-series bodies) allows up to 999 frames per sequence with 10 adjustable focus increments. The camera shoots the entire series automatically; post-processing in external software is still required for compositing. The Canon EOS R5 with its 45MP sensor provides the resolution headroom to crop and retain detail even from a large stack.
Nikon Z Series - Strong Option
Nikon's Focus Shift Shooting (Z5, Z6, Z7, Z6 II, Z7 II, D850, D6, D780) captures up to 300 frames per sequence. Like Canon, the camera shoots but does not composite - external software handles the merge. The Z7 II's 45.7MP sensor and excellent colour accuracy make it a strong choice for jewellery work.
Sony - Limited Built-In Support
The Sony A7R V supports focus bracketing with up to 299 frames and an adjustable step width (1-10 range). No in-camera compositing is available; compositing requires external software. For photographers using Sony and needing refined focus control, the CamRanger third-party app enables remote, precise focus adjustment from a connected device.
Olympus OM-D E-M1 Mark III - Unique Capability
The Olympus OM-D E-M1 Mark III remains notable for its in-camera focus stacking compositing - one of the few cameras that can output a fully stacked image directly, without external software. Useful for location work where laptop access is limited.
Usage: Focus Stacking by Subject Type
Product Photography
In commercial photography, focus stacking is often essential for producing images with high detail and sharpness across the entire product. This is particularly important where consumers pay close attention to detail - jewellery, electronics, precision instruments, and household products. Exposing the texture and detail of a product is critical for online retail where customers cannot inspect the product physically.
In the case of watches, for example, focus stacking enables sharpness on both the dial and the strap - impossible in a single frame due to shallow depth of field at macro distances.
Macro Photography
In macro photography, where we are photographing very small subjects such as insects, flowers, or water droplets, depth of field is naturally extremely limited. At 1:1 magnification with f/11, depth of field is approximately 2mm. At 5:1 magnification, it drops to 0.4mm - even f/22 cannot achieve full sharpness on a small beetle. Focus stacking is not optional at these scales: it is mandatory for professional-grade macro output.
The technique allows us to capture extraordinary detail of these small subjects, ensuring sharpness from front to back. Photographing a butterfly, for example, yields simultaneous focus on both the compound eyes and the wing patterns - effectively impossible in traditional macro photography.
Landscape Photography
In landscape photography, focus stacking can be used to render the entire frame sharp, from foreground to background. This is particularly useful when capturing detail in both extremely close and distant elements - flowers in the foreground and mountains in the background, for example.
However, using the technique in landscape requires substantially more field work and post-production effort, and presents real challenges with changing light and moving scene elements - trees, clouds, water. It is a considered tool rather than a routine one in this context.
When to Avoid Focus Stacking
In lifestyle photography, which celebrates spontaneity and authenticity, applying focus stacking disrupts the natural feel of the scene. These images benefit from subtle blur effects that add emotional depth and warmth. A portrait in a natural environment, where soft background blur directs attention to the subject, gains nothing from full-frame sharpness - and loses the intimacy that makes it work.
Street photography, reportage, and documentary work rely on the selective focus of a single frame to establish narrative and mood. The use of focus stacking in dynamic scenes can impose an artificial, clinical quality on images whose value comes precisely from their spontaneous imperfection.
The rule is straightforward: use focus stacking when complete sharpness serves the subject. When it does not - leave it out.
Selective Use: The Compromise Solution
Focus stacking does not have to cover the entire frame. In product photography, the technique is often used selectively - focusing only on the key elements of the product while leaving the background softly blurred. This achieves full sharpness on important details while preserving the depth and context of the scene.
An example is jewellery photography, where selective stacking achieves sharpness on the stones and metalwork while leaving the background out of focus - adding depth and isolating the product visually. In furniture-in-interior shots, the same principle applies: stack the product, let the room breathe.
3 Tips for Better Focus Stacking
- Err on the side of too many frames rather than too few. A gap in coverage produces bands of softness that cannot be recovered in post-processing. Overlap between frames should be at least 30%.
- Shoot in Manual mode - never Aperture Priority. Even a slight change in shutter speed between frames creates exposure inconsistency that produces artefacts in the merged result.
- In post-production, always review the merged result at 100% zoom before finalising. Edge halos and ghosting from subject movement are much easier to correct before you close the project.
Common Mistakes in Focus Stacking
1. Focus increment too large. The result is visible bands of softness between sharp zones. Five frames too many is far better than one frame too few.
2. Exposure inconsistency between frames. Aperture Priority mode adjusts shutter speed between shots, causing brightness variation across the series and artefacts in the blend. Always use Manual mode.
3. Vibration. Touching the camera, floor vibration, or a draft through an open window is enough to misalign frames. Use a 2-second timer, a cable release, and mirror lock-up on DSLRs.
4. Subject movement. A flower that moves in a draft, or a product on an unstable mount, produces ghosting in the final stack. Secure the subject before starting.
5. Diffraction from over-stopping-down. Stopping to f/16 or f/22 "for safety" reduces sharpness in every individual frame. The stacking sweet spot is f/5.6-f/8, where the lens is sharpest.
Summary
Focus stacking is an extremely useful tool in any photographer's arsenal. Applying the technique across product, macro, and landscape photography opens a wide range of possibilities for professionals at all levels. It is not a magic solution for every photographic scenario - it demands time, precision equipment, and skilled post-processing - but used with deliberate intent, it produces results that are simply unachievable any other way.
For jewellery, watches, electronics, and close-up product work, focus stacking is not optional: it is the standard. The gap between a partially sharp and a fully sharp product image is visible immediately, and it directly affects the perceived quality of the product and the photographer's work.
Leading focus stacking programs - Helicon Focus for speed, Zerene Stacker for precision, Photoshop for integrated Adobe workflows - have each carved a clear niche. In 2026, AI tools like Luminar Neo are adding a fourth option for photographers who need fast results without deep technical investment. Whether used in scientific illustration, product photography, or macro nature work, the meticulous nature of focus stacking assures that every detail is rendered with the utmost clarity - from the foreground to the very back.